|
Your computer does not return from suspend, wake from sleep or hibernate. If your computer does not Power On, see: Resolve No Power, No POST, No Boot or No Video issues with your Dell Computer CauseThe following is a list of some reasons why this behavior can happen. A BIOS update is needed. Out of date or corrupt chipset or video drivers. Incorrect Power Options settings. Old or corrupt hiberfil.sys file information. Software or applications causing behavior. Corrupt Windows system files. Resolution
Table of Contents: OverviewThis article covers troubleshooting steps to resolve issues with Dell computers that do not wake up from sleep, hibernate, or suspend mode. Generally this is the result of an incorrect Power State setting in the BIOS and Windows, or it could be a corrupted driver. The following troubleshooting steps should be done in a Top to Down order.
Note: If your computer is stuck in sleep or hibernation, a "Hard Shut Down" (press the power button until the computer shuts off) must happen.
The first step is to update the BIOS and chipset driver.
Warning: Ensure that BitLocker is suspended before flashing the BIOS on computers that have BitLocker enabled. If BitLocker is not suspended, the next time you reboot the computer it will not recognize the BitLocker key. A prompt to enter the recovery key to progress is shown, and this happens on each reboot.
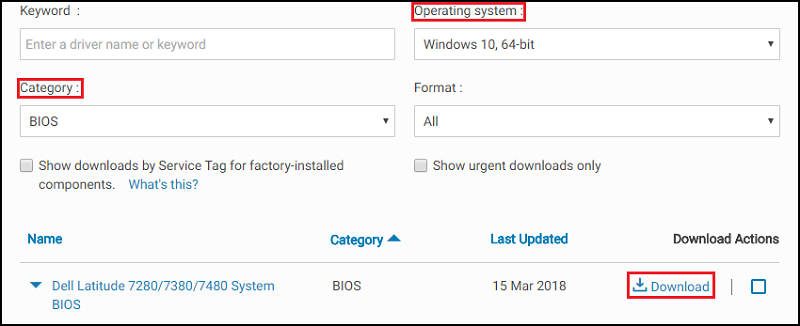
BIOS Open a Web Browser (Internet Explorer, Firefox, Chrome, so forth) and go to Dell.com/Support. Enter your System Service Tag or browse to the specific Model of System you have. Click the Drivers & Downloads tab. Select your Operating System in the drop-down box. Select BIOS in the Category drop-down box. Click the most recent version of the BIOS. Click Download to begin the download.
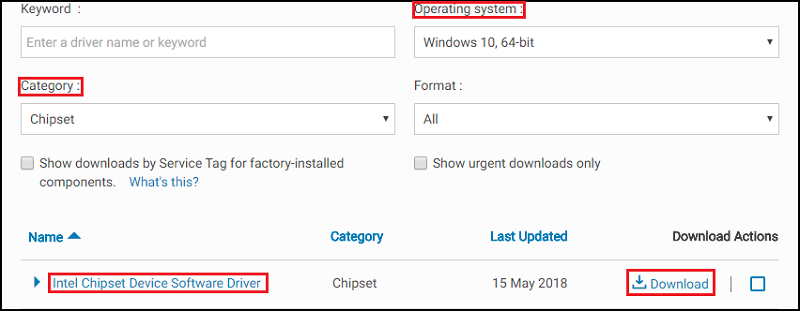
Save the file to your Desktop. After download, you can Double-Click the icon on your Desktop. Follow the On-Screen instructions to complete the installation. This reboots your computer and performs a BIOS update. Chipset Open a Web Browser (Internet Explorer, Firefox, Chrome, so forth) and go to Dell.com/Support. Enter your System Service Tag or browse to the specific Model of System you have. Click the Drivers & Downloads tab. Select your Operating System in the drop-down box. Select Chipset in the Category drop-down box. Click Intel Chipset Device. Click Download to begin the download.
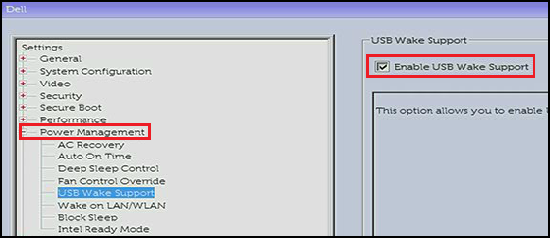
Click Download. You may receive a warning and an option to run or save the file. Click Save. When the Save As window appears, designate a folder to save the file that is being downloaded and click Save. The download progress window displays. Ensure that the checkbox next to "Close this dialog box when download completes" is cleared. When the download completes click Run or Allow. Note: The User Account Control window may appear, click Continue. A small window appears with Continue and Exit buttons, click Continue. In the Select the folder where you want to extract the files to window, click Ok. If a message appears asking to create a folder, click Yes. If a message appears asking to overwrite the folder, click Yes to All. In the "All files were successfully unzipped" window, click Ok. A new window appears, follow the prompts that appear to finish the installation. Once the BIOS and Chipset Driver have been updated, the computer should be tested to see if the issue is resolved. The following settings should be changed in the BIOS and in Windows. Note: If using a mouse and keyboard, ensure that they are connected directly to the computer or docking station and not a USB hub. BIOS: Power the computer On and press the F2 key at the Dell logo to enter the BIOS. Once in the BIOS, click the plus to the left of Power Management. Then Select USB Wake Support, check the box to Enable USB Wake Support. Click Apply at the bottom.
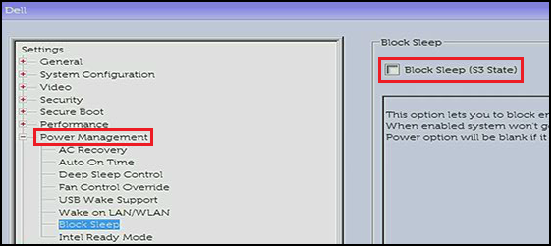
The Block Sleep Option (which can also be called Deep Sleep Control) is only available on Desktop computers, clear it to Disable it. Click Apply at the bottom.
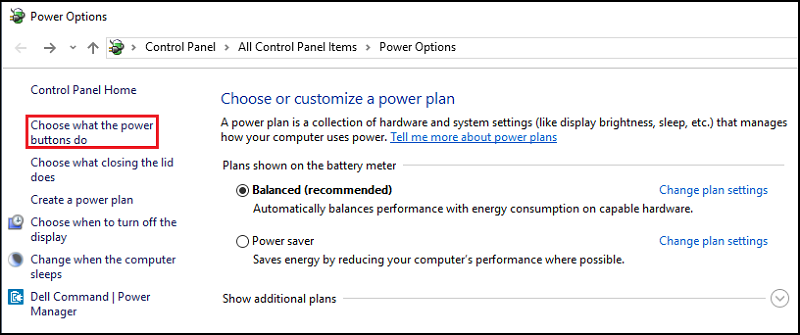
Exit the BIOS. Windows Power Options: Search for and open "Power Options" in the Start Menu. Click "Choose what the power buttons do" on the left side of the window.
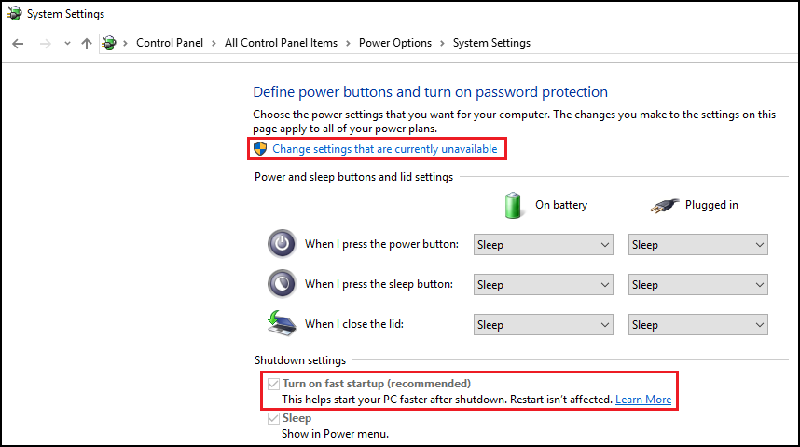
Click "Change settings that are currently unavailable." Under "Shutdown settings," ensure that the "Turn on fast startup" checkbox is cleared.
Once the BIOS and Windows Power Options have been changed, the computer should be tested to see if the issue is resolved. The Video driver should be the next item that is updated in the troubleshooting process. Some computers may have two video drivers that must be updated, the Intel Integrated driver. Then the nVidia or AMD discrete driver that is based on which was ordered with the computer. Video Driver Open a Web Browser (Internet Explorer, Firefox, Chrome, so forth) and go to Dell.com/Support. Enter your System Service Tag or browse to the specific Model of System you have. Click the Drivers & Downloads tab. Select your Operating System in the drop-down box. Select Video in the Category drop-down box. Click Intel HD Graphics. Note: You must download the nVidia or AMD driver as well, depending on if a discrete video card was ordered with the computer. Click Download to begin the download.
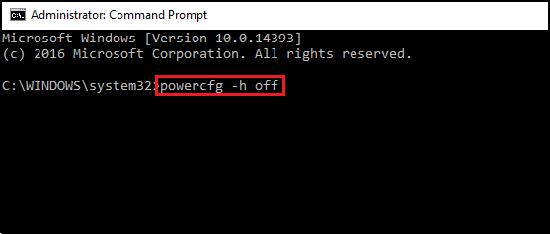
Click Download. You may receive a warning and an option to run or save the file. Click Save. When the Save As window appears, designate a folder to save the file that is being downloaded and click Save. The download progress window displays. Ensure that the checkbox next to "Close this dialog box when download completes" is cleared. When the download completes click Run or Allow. Note: The User Account Control window may appear, click Continue. A small window appears with Continue and Exit buttons, click Continue. In the Select the folder where you want to extract the files to window, click Ok. If a message appears asking to create a folder, click Yes. If a message appears asking to overwrite the folder, click Yes to All. In the "All files were successfully unzipped" window, click Ok. A new window appears, follow the prompts that appear to finish the installation. Once the Video Driver has been updated, the computer should be tested to see if the issue is resolved. Refresh the hiberfil.sys file by disabling and enabling, this resets the file if it is corrupted. You must run this from an Administrator Command Prompt window. Copy and paste the command into the Command Prompt window:
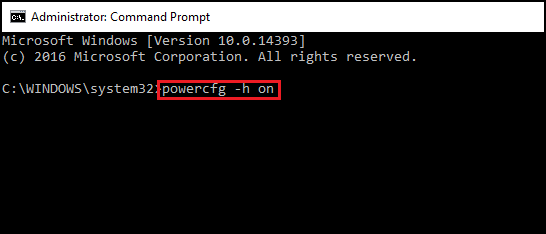
Restart the computer, and go to an Administrator Command Prompt window again. Copy and paste the command into the Command Prompt window:
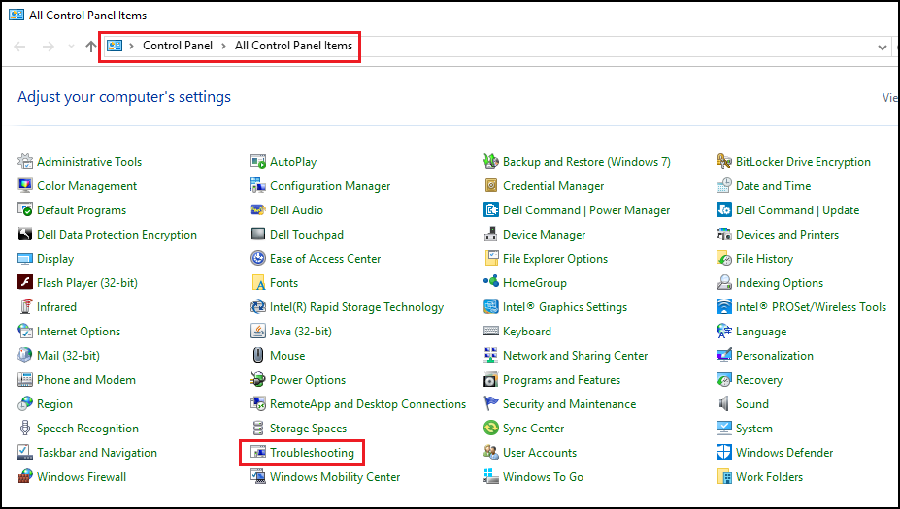
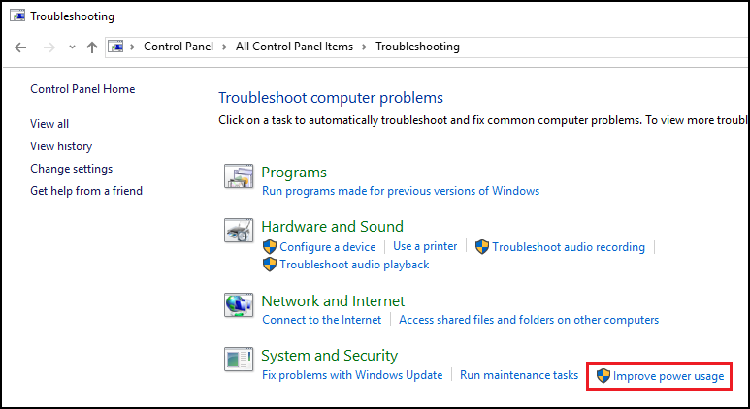
Restart the computer one more time. The hiberfil.sys should be refreshed. Once the hiberfil.sys file has been refreshed, the computer should be tested to see if the issue is resolved. You can run the Windows Power Troubleshooter to adjust your computer's power settings. The Power Troubleshooter checks your computer's timeout settings, which determine how long the computer waits before turning off the monitor display or entering sleep mode. Note: Adjusting these settings can help you conserve power and extend your laptop's battery life. To run the Windows Power Troubleshooter, follow these instructions: In Windows, search for and open the Control Panel. In the Control Panel Search field, type Troubleshooting. Click Troubleshooting.
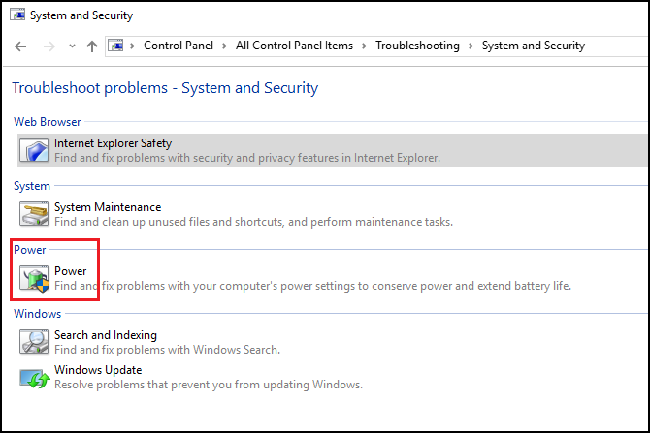
Under System and Security, click Improve Power Usage.
Click Power to run the Troubleshooting tool.
A "Detecting Issues" window displays while Windows detects and attempts to fix any issues. After Troubleshooting is complete, close the Troubleshooter, or click Explore Additional Options if needed. After Windows Power Settings have been adjusted, the computer should be tested to see if the issue is resolved. To perform a Clean Boot using the Microsoft Config Utility on the computer, use the following steps: From the Search Box, type msconfig and press Enter. Click the Startup tab. Click Disable all and click Apply. Click the Services tab. Check the box that says Hide all Microsoft services and then click Disable all. Restart the System and check if the issue is resolved. If it is still present, repeat the steps above to reenable all services and startup items. Start looking at the program, driver, or device for the issue. This procedure is critical in avoiding unnecessary Operating System reinstalls. This process is temporary and is required to see if a Startup Item or Service is causing the issue. To return the Boot Process to a Normal Startup In MSCONFIG. From the Search Box, type msconfig and press Enter. Click the General tab. Click Normal startup. Click OK. Click Yes when you are prompted to restart your computer. If the issue remains after testing, go to the next step. Create a New User ProfileTo add a new user in Windows, ensure that you are logged in with an account that has Administrator privileges. Windows 11 Select Start > Settings > Accounts > "Other Users." Click the "Add Account Button." Click "I Don't Have this Person's Sign-in Information." Click "Add a User without a Microsoft Account." Enter the Username into the "Who's Going to Use this PC?" field. Click "Next." Windows 10 Select Start > Settings > Accounts > "Family & Other Users." Under Other Users, select "Add Someone Else to this PC." Click "I Don't Have this Person's Sign-in Information." Click "Add a User without a Microsoft Account." Enter the Username into the "Who's Going to Use this PC?" field. Click "Next." In case if the account is not an administrator account, follow the instructions below. Use the Windows key + I keyboard shortcut to open the Settings app. Click Accounts. Click Family & Other People. Under Other people, select the user account, and click Change Account Type. Under Account type, select Administrator from the drop-down menu. Click OK to complete the task. The computer should be tested to see if the issue happens in the new Account. If the issue does not happen with the new Account, the issue lies in the original Account. If System Protection is enabled on your computer, Windows automatically creates a restore point whenever you install new Windows updates. Note: System Restore does not delete any of your files. You may have to reinstall any software, updates, or drivers that were installed after the date you are taking the computer back to. How to Use System Restore in Microsoft Windows The System File Checker (SFC) tool is built into Windows and can scan your Windows computer files for corruption or any other changes. If a file has been modified, it automatically replaces that file with the correct version. Open an Administrator Command Prompt. In Windows 10 or 11, right-click the Windows button and select "Command Prompt (Admin)." Type the following command into the Command Prompt window: When the SFC scanner is done, the computer should be tested to see if the issue is resolved. If the issue remains after all troubleshooting steps (except for the optional Connected Standby step) have been performed, you should reinstall your operating system. Note: Programs and all Data must be backed up. Prior to reinstalling the operating system, you must create Windows recovery media. Instructions on how to do this with your Dell System may be found in the following articles. Windows 11 Step-by-step instructions for reinstalling Windows 11 can be found in the following article with videos available. Windows 10 Step-by-step instructions for reinstalling Windows 10 can be found in the following article with videos available.
NOTE: Offers are only available for US, Canada, UK, France, Germany, and China personal computer customers. Server and Storage not applicable. Affected Products Alienware, Dell All-in-One, Dell Pro All-in-One, Dell Pro Max Micro, Dell Pro Max Slim, Dell Pro Max Tower, Dell Pro Micro, Dell Pro Slim, Dell Pro Tower, Dell Slim, Dell Tower, Inspiron, OptiPlex, Vostro, XPS, G Series, G Series, Alienware , Dell Plus, Dell Pro, Dell Pro Max, Dell Pro Plus, Dell Pro Premium, Inspiron, Latitude, Dell Pro Rugged, Vostro, XPS, Fixed Workstations, Mobile Workstations, Dell Pro Max Micro XE FCM2250, Dell Pro Max Slim XE FCS1250, Dell Pro Max Tower T2 XE FCT2250, Dell Pro Max 16 XE MC16250, Dell Pro Micro Plus XE QBM1250, Dell Pro Slim Plus XE5 QBS1250, Dell Pro Tower Plus XE5 QBT1250 ... View More about warranties View Less about warranties (责任编辑:) |