|
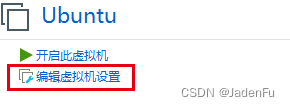
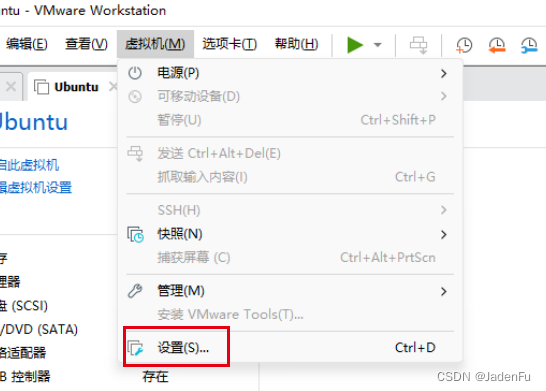
特别注意:本教程基于VMware虚拟机,安装Ubuntu22.04。其他类型虚拟机及Linux其他版本配置相似但有所不同。 1. 虚拟机配置 1.1 打开虚拟机设置。
或
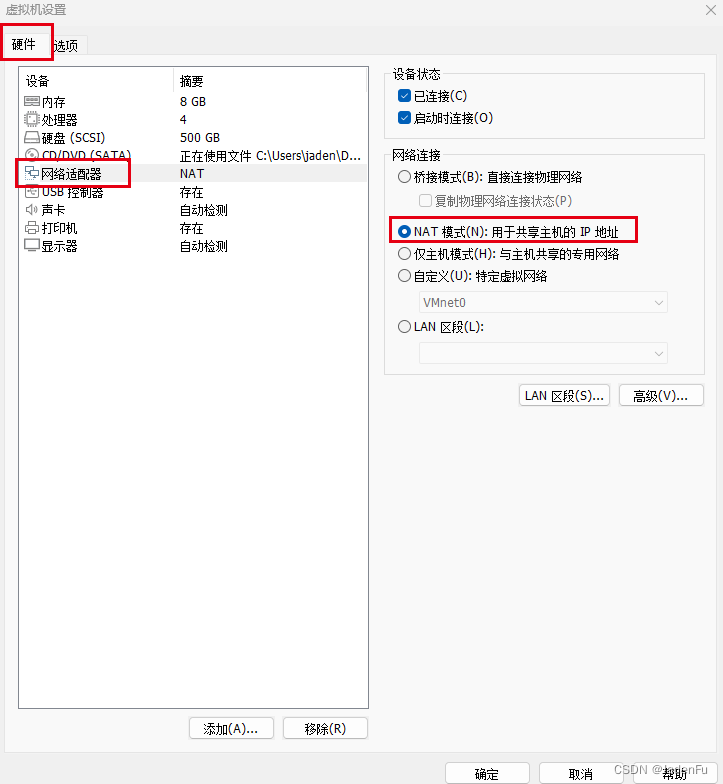
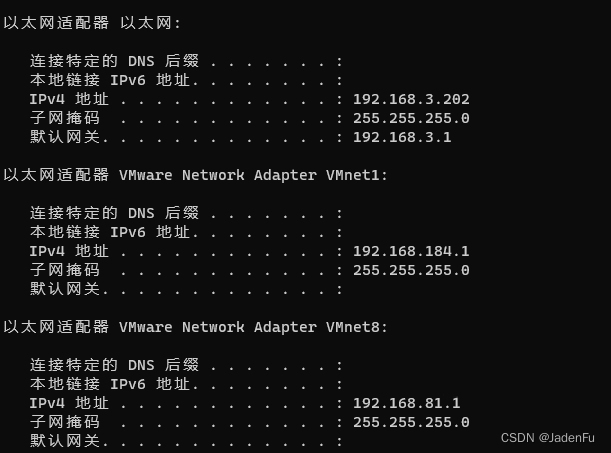
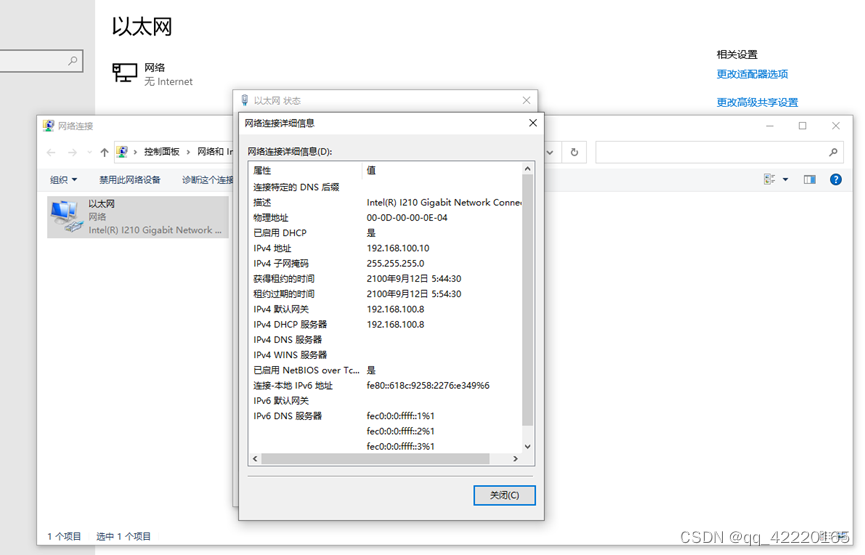
开启虚拟机系统后,查看主机分配的虚拟机IP地址。此时可以看到虚拟机被分配了两个网络,其中VMnet1为1.2中网络连接选择“仅主机模式”时使用的网络,VMnet8为网络连接选择“NAT模式”时使用的网络。 由于我们选择的是“NAT模式”,因此需要记下VMnet8中IPv4地址,即192.168.81.1,子网掩码为255.255.255.0。.
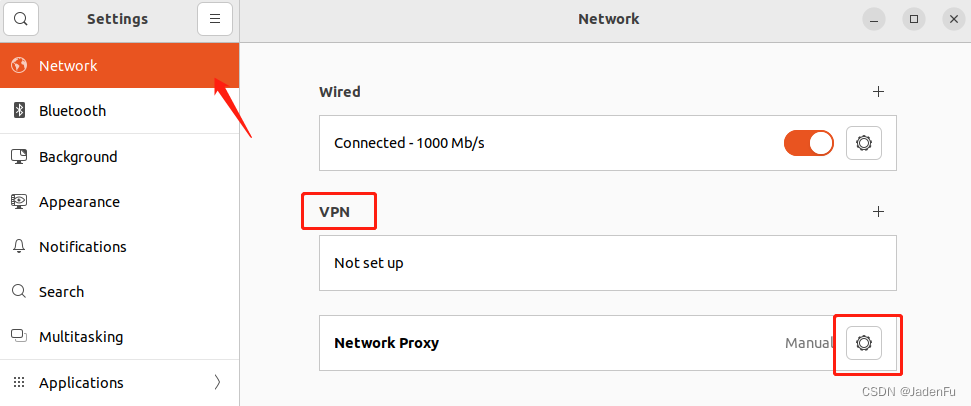
代理工具内查看监听端口号,一般为10809或7890,其他工具请自行查找。同时须开启代理工具内“允许来自局域网的连接”。 3. Ubuntu虚拟机设置 3.1 配置网络代理打开Ubuntu设置,选择网络-网络代理,点击右侧按钮进入设置界面。
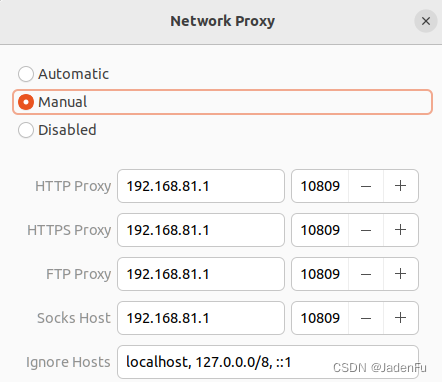
选择“手动”,填写下方相关代理IP和监听端口,IP地址为2.1中VMnet8下IPv4地址,端口为代理工具使用端口。
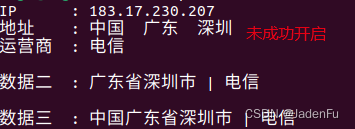
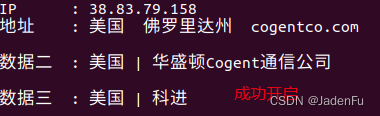
重启虚拟机网络后,开启主机代理,打开虚拟机终端运行: curl cip.cc如代理成功,会显示代理方IP地址及相关数据,如未成功则显示本地所在网络信息。
如无需代理时,可选择将虚拟机网络代理设置为“关闭”,或在主机内断开代理工具代理即可。 4. 代理开关快捷方式 4.1 编写.sh文件新建.sh文件。 开启代理版
#!/bin/bash
#设置代理为手动
gsettings set org.gnome.system.proxy mode 'manual'
#终端反馈
echo "已开启"
echo 按任意键继续
#确保反馈后未按键时不会退出终端
read -n 1 关闭代理版
#!/bin/bash
#设置代理为无
gsettings set org.gnome.system.proxy mode 'none'
#终端反馈
echo "已关闭"
echo 按任意键继续
#确保反馈后未按键时不会退出终端
read -n 1 4.2 编写.desktop文件新建.desktop文件,输入以下内容,并移动至桌面(注意文件不可删除.desktop后缀,否则系统会默认为文本文件,下方内容中Name字段会修正图标显示文字)。 开启代理版
[Desktop Entry]
#快捷方式显示名称
Name = ON
#待执行.sh文件路径
Exec = /home/fujd/Desktop/ProxyControl/proxyManual.sh
#待执行.sh文件所在目录
Path = /home/fujd/Desktop/ProxyControl
#快捷方式显示图标路径
Icon = /home/fujd/Desktop/ProxyControl/ON.png
#是否显示终端,为确保.sh文件的echo能够被看到,此处要选择true
Terminal = true
#快捷方式类型
Type = Application 关闭代理版
[Desktop Entry]
#快捷方式显示名称
Name = OFF
#待执行.sh文件路径
Exec = /home/fujd/Desktop/ProxyControl/proxyDisabled.sh
#待执行.sh文件所在目录
Path = /home/fujd/Desktop/ProxyControl
#快捷方式显示图标路径
Icon = /home/fujd/Desktop/ProxyControl/OFF.png
#是否显示终端,为确保.sh文件的echo能够被看到,此处要选择true
Terminal = true
#快捷方式类型
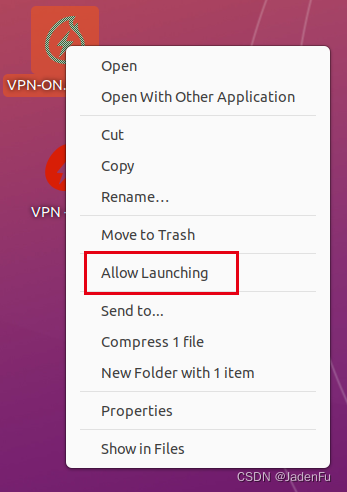
Type = Application 4.3 实现快捷方式功能现阶段此.desktop文件不可用,需要右键点击文件,选择“允许启动”,此时图标转换,可以双击运行,实现代理开启或关闭。
通过以上设置,我们已经可以通过全局代理方式在虚拟机上访问之前无法访问的网站和应用服务了,但某种情况下终端可能会无法被代理,或只是终端需要代理,不想如此麻烦进行设置。如果只需要在终端上实现代理,可以使用“proxychains”工具,具体方法如下: 5.1 安装proxychains可以选择apt直接安装,两种版本均可,但要注意,如果安装proxychains4,后续所有配置都需要将proxychains替换为proxychains4。
#4以下版本
apt-get install proxychains
#4及以上版本
apt-get install proxychains4 或通过make编译,编译配置不在此介绍。
git clone https://github.com/rofl0r/proxychains-ng
cd proxychains-ng
./configure
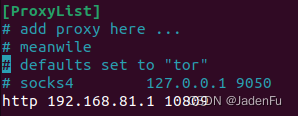
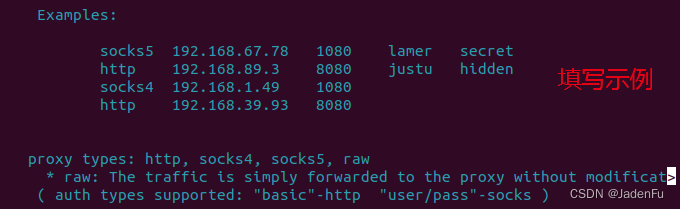
sudo make && make install 5.2 配置proxychainsproxychains 的配置文件位于 /etc/proxychains.conf ,打开后在末尾添加根据需要填写使用的代理,前缀、IP地址和端口号与3.1内配置一致。不了解如何填写可以看.conf文件内的示例。
使用方法非常简单,在需要执行的命令前输入proxychains+空格即可,例如: proxychains git clone https://github.com/xxxx/xxxx.git但注意,使用ping命令时候添加proxychains无效,因为 proxychains 只会代理 TCP 连接,而 ping 使用的是 ICMP。 在使用proxychains进行命令行代理时,要保持主机代理工具处于代理状态,虚拟机无需设置或打开代理。 验证是否成功的方法与3.2一致。 ubuntu apt install 工具添加网络代理_apt install proxy-CSDN博客 Create a new configuration file named proxy.conf. sudo touch /etc/apt/apt.conf.d/proxy.conf Open the proxy.conf file in a text editor. sudo vi /etc/apt/apt.conf.d/proxy.conf
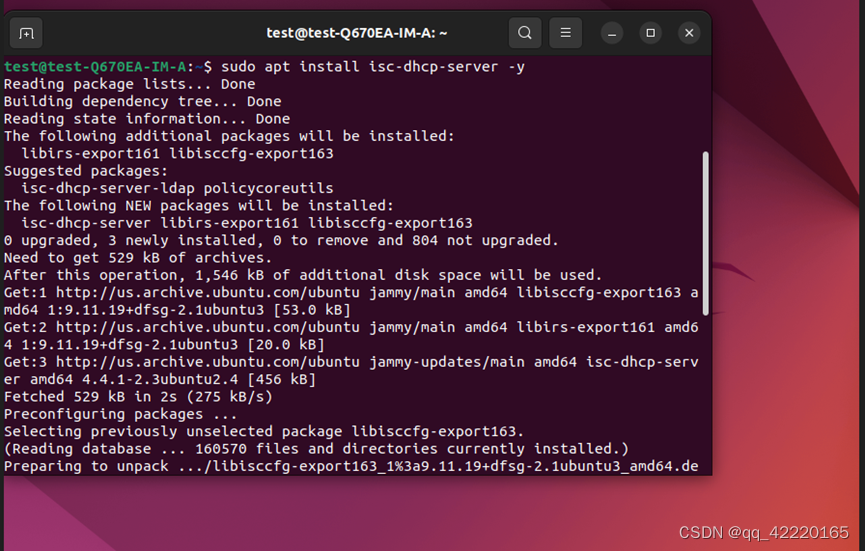
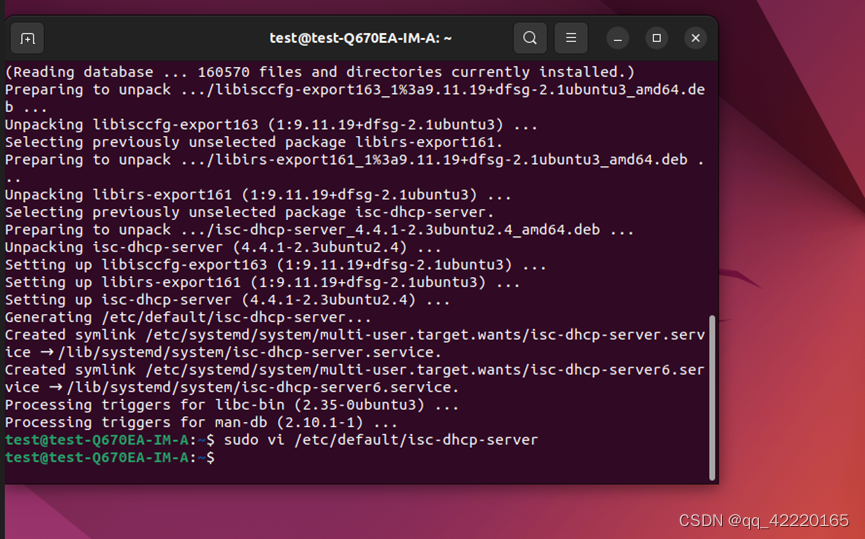
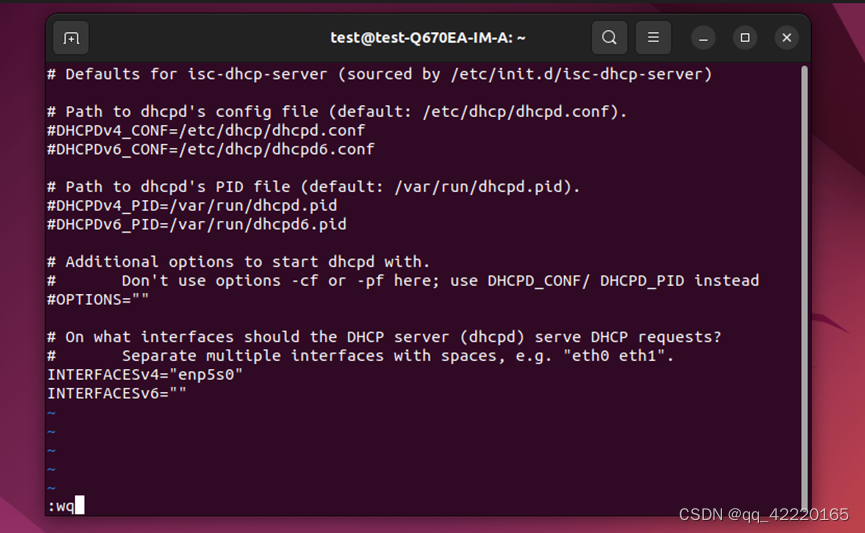
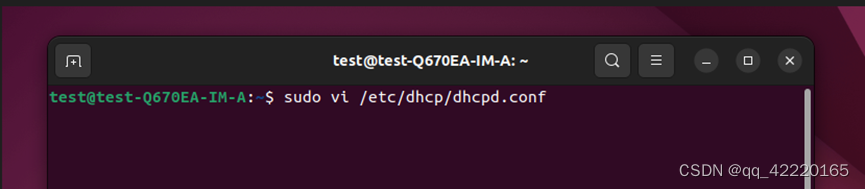
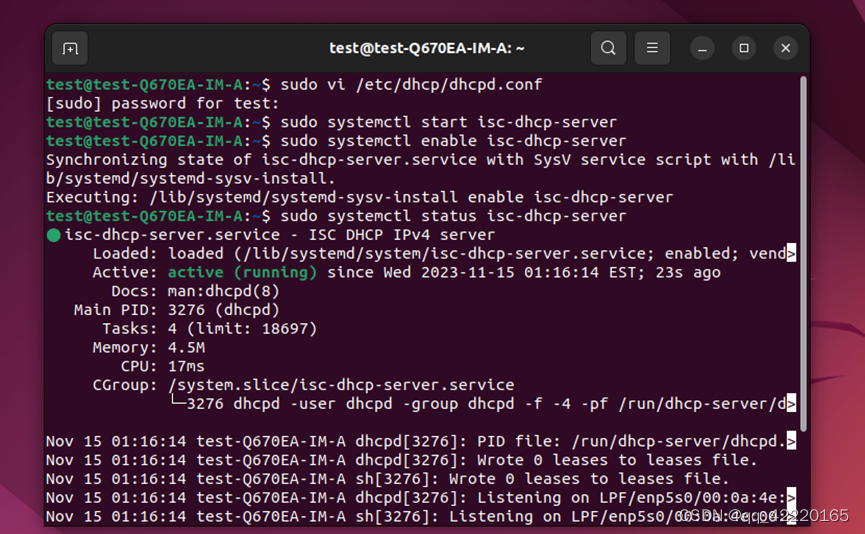
Just like in the first example, create a new file under the /etc/apt/apt.conf.d directory, and then add the following lines. Acquire { HTTP::proxy "http://127.0.0.1:8080"; HTTPS::proxy "http://127.0.0.1:8080"; }ubuntu 22.04版本修改服务器名、ip,dns信息的操作方法_ubuntu 22.04 修改ip-CSDN博客 总结 2、ubuntu 22.04操作系统配置ip和dns信息,一般只需要使用netplan命令行工具来配置就行,在/etc/netplan/在目录下创建一个yaml文件就可以实现ip和dns的配置,当然如果/etc/netplan下有多个yaml文件,则所有/etc/netplan/*.yaml文件都将被netplan命令行使用,参见官方文档https://ubuntu.com/server/docs/network-configuration和https://manpages.ubuntu.com/manpages/jammy/man5/netplan.5.html 3、个人不建议使用/etc/resolve.conf来配置ubuntu 22.04操作系统的dns信息,因为太复杂了,这个文件是被systemd-resolved服务托管。ubuntu操作系统/etc/resolve.conf中默认使用的是 nameserver 127.0.0.53回环地址,/etc/resolve.conf文中有这么一句话This is /run/systemd/resolve/stub-resolv.conf managed by man:systemd-resolved(8). Do not edit。说明这个文件是被systemd-resolved这个服务托管的。通过 netstat -tnpl| grep systemd-resolved 查看到这个服务是监听在 53 号端口上。为啥要用127.0.0.53作为回环地址而不是127.0.0.1,因为127网段都是回环地址(127.0.0.1 - 127.255.255.254),不过通常用大家只喜欢用127.0.0.1来表示而已,53表示dns端口 4、ubuntu官方不建议使用/etc/resolve.conf来配置ubuntu 的dns信息,ubuntu对于/etc/resolv.conf的官方描述:If you require DNS for your temporary network configuration, you can add DNS server IP addresses in the file /etc/resolv.conf. In general, editing /etc/resolv.conf directly is not recommended, but this is a temporary and non-persistent configuration. 5、ubuntu 22.04查看dns信息的命令是resolvectl status,该命令可以看到全局dns信息和某个网卡的dns信息,全局DNS服务器信息一般来自配置文件/etc/systemd/resolved.conf,仅在/etc/resolv.conf不是一个指向/run/systemd/resolve/stub-resolv.conf, /usr/lib/systemd/resolv.conf, /run/systemd/resolve/resolv.conf 之一的软连接的情况下,且/etc/systemd/resolved.conf中dns被注释掉的情况下,全局DNS服务器才会读取自/etc/resolv.conf,所以这就是不建议大家使用/etc/resolve.conf来配置ubuntu 的dns信息的原因。 修改服务器名 修改IP 备注: 查看网关 root@FRSBachDEV3:~# ip route | grep default default via 172.22.136.1 dev ens160 proto static root@FRSBachDEV3:~# nmcli dev show|grep GATEWAY IP4.GATEWAY: 172.22.136.1 IP6.GATEWAY: -- IP4.GATEWAY: -- IP6.GATEWAY: --查看dns root@FRSBachDEV3:~# resolvectl status Global Protocols: -LLMNR -mDNS -DNSOverTLS DNSSEC=no/unsupported resolv.conf mode: stub Link 2 (ens160) Current Scopes: DNS Protocols: +DefaultRoute +LLMNR -mDNS -DNSOverTLS DNSSEC=no/unsupported Current DNS Server: 172.22.10.66 DNS Servers: 172.22.10.66 172.22.10.67 DNS Domain: dai.netdai.com netdai.com实验:如何才会使用到/etc/resolve.conf中的dns信息 /etc/systemd/resolved.conf中dns为172.22.136.2 root@FRSBachDEV3:~# cat /etc/systemd/resolved.conf |grep DNS= DNS=172.22.136.2 /etc/resolv.conf来自软链接/run/systemd/resolve/stub-resolv.conf root@FRSBachDEV3:~# ll /etc/resolv.conf lrwxrwxrwx 1 root root 39 Aug 9 2022 /etc/resolv.conf -> ../run/systemd/resolve/stub-resolv.conf root@FRSBachDEV3:~# cat /run/systemd/resolve/stub-resolv.conf nameserver 127.0.0.53 options edns0 trust-ad search dai.netdai.com netdai.com /run/systemd/resolve/resolv.conf有来自/etc/systemd/resolved.conf中dns 172.22.136.2,也有来自/etc/netplan/00-installer-config.yaml中dns 172.22.10.66 172.22.10.67,就是没有来自/etc/resolv.conf的127.0.0.53 root@FRSBachDEV3:~# cat /run/systemd/resolve/resolv.conf nameserver 172.22.136.2 nameserver 172.22.10.66 nameserver 172.22.10.67 search dai.netdai.com netdai.com /etc/systemd/resolved.conf中dns 172.22.136.2和/etc/netplan/00-installer-config.yaml中dns 172.22.10.66 172.22.10.67,就是没有来自/etc/resolv.conf的127.0.0.53 root@FRSBachDEV3:~# resolvectl status Global Protocols: -LLMNR -mDNS -DNSOverTLS DNSSEC=no/unsupported resolv.conf mode: stub Current DNS Server: 172.22.136.2 DNS Servers: 172.22.136.2 Link 2 (ens160) Current Scopes: DNS Protocols: +DefaultRoute +LLMNR -mDNS -DNSOverTLS DNSSEC=no/unsupported Current DNS Server: 172.22.10.66 DNS Servers: 172.22.10.66 172.22.10.67 DNS Domain: dai.netdai.com netdai.com 删除/etc/resolv.conf来自软链接,并手工建立/etc/resolv.conf文件,其中dns为172.22.136.3 root@FRSBachDEV3:~# ll /etc/resolv.conf -rw-r--r-- 1 root root 946 Oct 12 10:49 /etc/resolv.conf root@FRSBachDEV3:~# cat /etc/resolv.conf nameserver 172.22.136.3 options edns0 trust-ad search dai.netdai.com netdai.com 保留/etc/systemd/resolved.conf中dns 172.22.136.2的情况下,重启systemd-resolved,发现还是用的/etc/systemd/resolved.conf中dns 172.22.136.2而没有使用手工建立/etc/resolv.conf文件的dns 172.22.136.3 root@FRSBachDEV3:~# systemctl restart systemd-resolved root@FRSBachDEV3:~# resolvectl status Global Protocols: -LLMNR -mDNS -DNSOverTLS DNSSEC=no/unsupported resolv.conf mode: foreign DNS Servers: 172.22.136.2 Link 2 (ens160) Current Scopes: DNS Protocols: +DefaultRoute +LLMNR -mDNS -DNSOverTLS DNSSEC=no/unsupported DNS Servers: 172.22.10.66 172.22.10.67 DNS Domain: dai.netdai.com netdai.com 注释掉/etc/systemd/resolved.conf中dns再重启systemd-resolved,发现这个时候才真正用上了手工建立/etc/resolv.conf文件的dns 172.22.136.3 root@FRSBachDEV3:~# vim /etc/systemd/resolved.conf root@FRSBachDEV3:~# cat /etc/systemd/resolved.conf |grep DNS #DNS root@FRSBachDEV3:~# systemctl restart systemd-resolved root@FRSBachDEV3:~# resolvectl status Global Protocols: -LLMNR -mDNS -DNSOverTLS DNSSEC=no/unsupported resolv.conf mode: foreign Current DNS Server: 172.22.136.3 DNS Servers: 172.22.136.3 DNS Domain: dai.netdai.com netdai.com Link 2 (ens160) Current Scopes: DNS Protocols: +DefaultRoute +LLMNR -mDNS -DNSOverTLS DNSSEC=no/unsupported DNS Servers: 172.22.10.66 172.22.10.67 DNS Domain: dai.netdai.com netdai.com root@FRSBachDEV3:~# cat /run/systemd/resolve/resolv.conf nameserver 172.22.136.3 nameserver 172.22.10.66 nameserver 172.22.10.67 search dai.netdai.com netdai.comUbuntu18.04 使用netplan配置局域网DHCP主从机_netplan 配置dhcp-CSDN博客 安装 sudo apt install isc-dhcp-server 修改/etc/dhcp/dhcpd.conf配置文件,设置本DHCP的配置 default-lease-time 180; max-lease-time 600; authoritative; subnet 192.168.90.0 netmask 255.255.255.0 { range 192.168.90.150 192.168.90.200; #随机分配IPv4地址池 option routers 192.168.90.254;#网关地址(网关的IP地址就是具有路由功能的设备的IP地址,比如路由器或者启用了路由协议的服务器) option domain-name-servers 192.168.90.1,192.168.90.2;# option domain-name "rsync DHCP network"; }修改/etc/default/isc-dhcp-server,确定DHCP的监听端口 INTERFACESv4="eno1"更新配置 sudo systemctl restart isc-dhcp-server.service 修改/etc/netplan/01-network-manager-all.yaml,给有线网口eno1配置静态IP地址 network: version: 2 renderer: NetworkManager ethernets: eno1: addresses: [192.168.90.1/24] gateway4: 192.168.90.254 dhcp4: no #意思是在识别eno1的IP地址时不需要使用DHCP动态分配,因此在从机端设为yes/true nameservers: addresses: [8.8.8.8]保存配置 sudo netplan apply 启动DHCP服务 sudo service isc-dhcp-server start (start/restart/stop) 配置DHCP从机 修改etc/netplan/netplan.yaml network: ethernets: eth0: dhcp4: yes version:2使用ifconfig,发现已配置192.168.90.150,配置成功 辅助命令 nmcli dev show 查看每个端口的网络配置信息 nmcli connection show 查看每个端口的联网情况 service isc-dhcp-server status 查看状态 参考文档 《ubuntu server guide》 ubuntu配置IP地址,网关,DNS和路由_ubuntu ip route add_QJings的博客-CSDN博客 自建DHCP服务之isc-dhcp-server_王三三的博客-CSDN博客 A Step-by-Step Guide to Set up a DHCP Server on Ubuntu - LinuxForDevices 1. User and password — Firefly Wiki (t-firefly.com) Ubuntu 22.04下配置DHCP_ubuntu22.04 dhcp 服务器配置-CSDN博客 3.登录Ubuntu 22.04系统,运行apt命令更新包sudo apt update
sudo apt install isc-dhcp-server -y
a. sudo vi /etc/default/isc-dhcp-server
b. 修改DHCP网络接口为上文所提到的enp5s0(这边根据自己的配置来)
a. sudo vi /etc/dhcp/dhcpd.conf
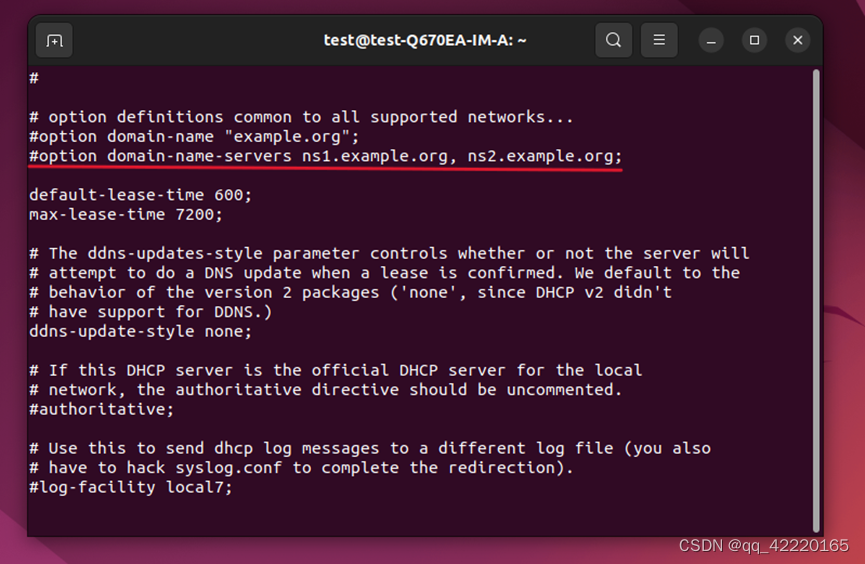
b. 注释掉域名服务器参数
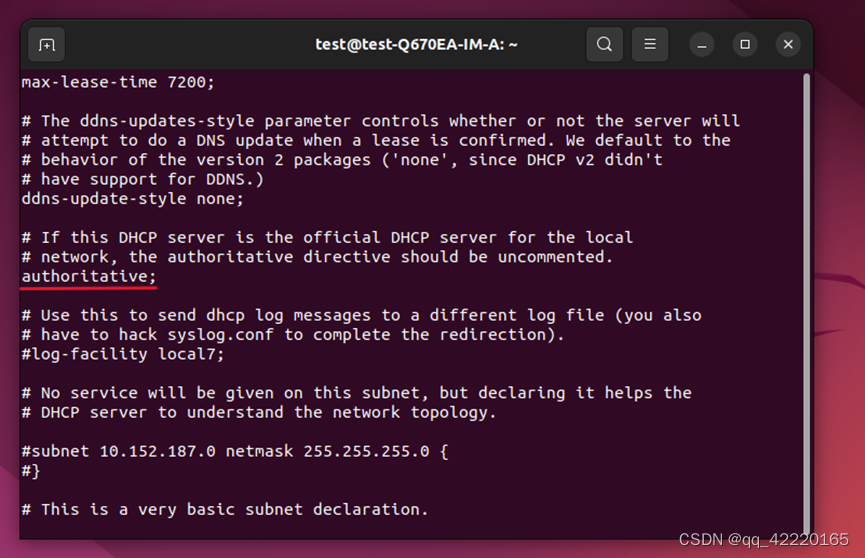
c. 取消authoritative参数注释
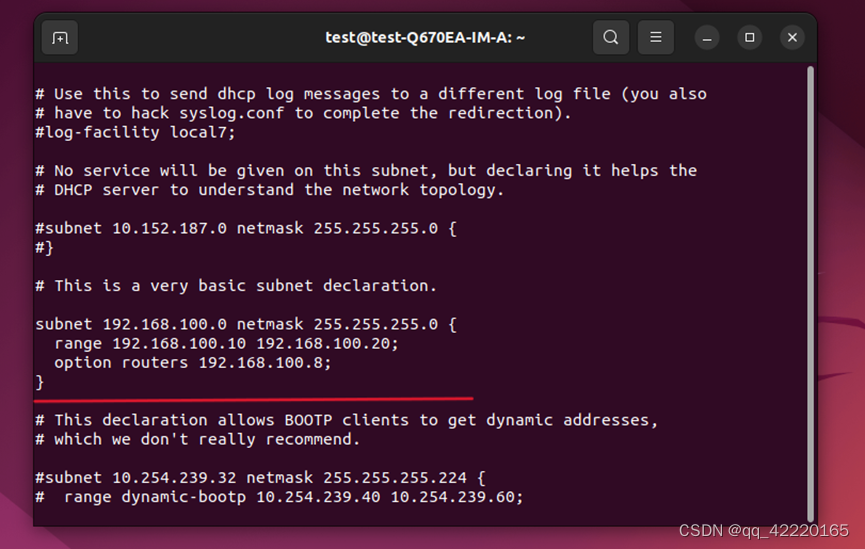
d. 添加DHCP服务器所使用的子网和IP地址范围。同时指定enp5s0接口的ip地址为路由器 subnet 192.168.100.0 netmask 255.255.255.0{
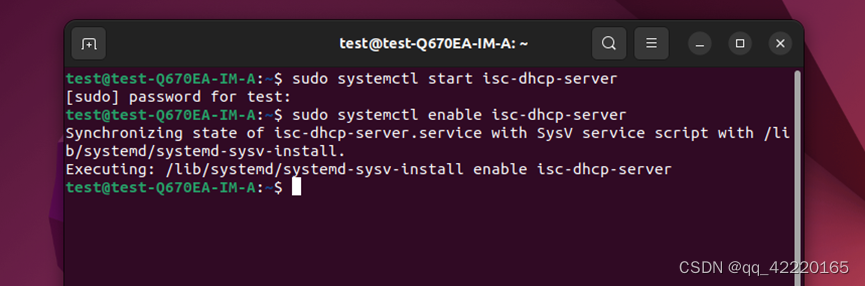
a. sudo systemctl start isc-dhcp-server
sudo systemctl status isc-dhcp-server
一. 环境变量方法 export http_proxy=http://127.0.0.1:8000 二.设置apt-get的配置 三.在命令行临时带入 |